Special Model Conversion
Gray Scale Model Conversion
Gray scale models refer to models whose input is single-channel image, that is, models with input C dimension = 1.
Gray Scale Model input_config Configuration
The usage of input_config.ini is set forth in input config Configuration. For gray scale models, special attention should be paid to the following:
The two configurations in the input_config.ini file should be set as follows:
[INPUT_CONFIG]
......
training_input_formats=RGB;
input_formats=GRAY;
......
The effective data of gray scale images is put in R channel only, so configuring R-channel mean value (mean_red) will be enough.
[INPUT_CONFIG]
......
mean_red=127.5;
mean_green=0.0;
mean_blue=0.0;
;std_value parameter for image models,
std_value=1.0;
Pre-Processing of Gray Scale Images
The pre-processing method for gray scale images before conversion is the same as the one discussed in Image Pre-Processing Method. The function should include two parameters, as follows:
-
Image path
-
Normalized tag (norm=True)
A reference code is placed at SGS_IPU_SDK/Scripts/calibrator/preprocess_method/caffe_lenet.py.
import cv2
import numpy as np
def get_image(img_path, resizeH=28, resizeW=28, norm=True, meanR=33.318, std=1):
    img = cv2.imread(img_path, flags=-1)
    try:
        img_dim = img.shape[2]
    except IndexError:
        img_dim = 1
    if img_dim == 3:
        img = cv2.cvtColor(img, cv2.COLOR_BGR2GRAY)
    elif img_dim == 4:
        img = cv2.cvtColor(img, cv2.COLOR_BGRA2GRAY)
    img_norm = cv2.resize(img, (resizeW, resizeH), interpolation=cv2.INTER_LINEAR)
    if norm:
        img_norm = (img_norm - meanR) / std
        img_norm = np.expand_dims(img_norm, axis=2)
        dummy = np.zeros((28, 28, 2))
        img_norm = np.concatenate((img_norm, dummy), axis=2)
        img_norm = img_norm.astype('float32')
    return img_norm
def image_preprocess(img_path, norm=True):
    return get_image(img_path, norm=norm)
Please Note:
-
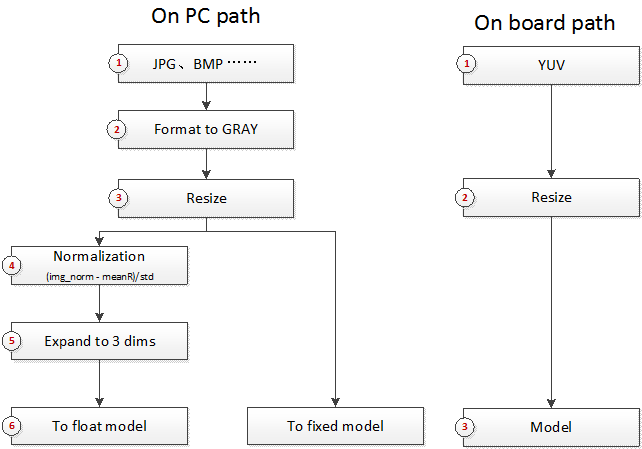
Gray scale image input model has different operation depending on whether it is run on PC or on development board. On PC, the single-channel image must be expanded to 3 dimensions, with 0 padded to the two following channels; on development board, YUV image input data is required.
RAWDATA_S16_NHWC Input Model
RAWDATA_S16_NHWC can be used as the input of the back-end network model of segmented network, or the non-image data input of other network model.
Due to hardware limitation, data should be arranged before use to allow the calculation to get started.
The method of conversion is basically the same as described in the foregoing section, only training_input_formats and input_formats in input_config.ini needs to be set to RAWDATA_S16_NHWC.
Model Conversion
When training_input_formats and input_formats in input_config.ini are both set to RAWDATA_S16_NHWC, mean_red, mean_green, mean_blue and std_value in input_config.ini will no longer take effect in fixed-point network models, and all pre-processing procedure will be done before model input. Besides, it is no more necessary to configure mean_red, mean_green, mean_blue and std_value either.
Since the model during conversion by calibrator.py would still use floating-point data, the method of conversion is no different from the method used for normal network. Please refer to Calibrator for the specific usage.
Model Operation
The method of use of floating-point models is the same as the one used for operating image input models.
When using simulator.py to operate fixed-point models, the pre-processing method should be consistent with the one used for pre-processing floating-point models, that is, norm must be True. In other words, when doing network preprocessing of Python file using RAWDATA_S16_NHWC, all compilation must be done based on norm = True. The simulator.py will read the original floating-point data, perform dequantization and alignment against the data, and then input the dequantized and aligned data to fixed-point models.
When using calibrator_custom.fixed_simulator, you have to carry out the fixation and alignment process on your own. The following illustrates the method of implementation of the fixation and alignment process.
>>> import calibrator_custom
>>> model = calibrator_custom.fixed_simulator('./mobilenet_v2_s16_fixed.sim')
>>> input_details = model.get_input_details()
>>> print(input_details)
[{'input_formats': 'RAWDATA_S16_NHWC', 'training_input_formats': 'RAWDATA_S16_NHWC', 'shape': array([ 1, 513, 513, 8]), 'name': 'sub_7', 'dtype': <class 'numpy.int16'>, 'index': 0, 'quantization': (3.0518509447574615e-05, 0)}]
The calibrator_custom.fixed_simulator checks the input format of the model and comes up with the input shape information via calculation.
Image preprocessed using floating-point network returns the variable img in numpy.ndarray format:
>>> print(img.shape)
(1, 513, 513, 3)
To fix img data and convert the data type:
>>> ins, zp = input_details[0]['quantization']
>>> img = (img / ins + zp).astype(input_details[0]['dtype'])
>>> print(img.dtype)
int16
Please align img data to make it consistent with the input requirement. Note that the alignment is an upward alignment and takes effect only on the last dimension of the input.
>>> img_s16 = np.zeros(input_details[0]['shape']).astype('int16')
>>> img_s16[:, :, :, :3] = img
>>> model.set_input(input_details[0]['index'], img_s16)
Since the foregoing step is done in simulator.py, to operate fixed-point models using simulator.py, the preprocessing method should be in conformance with the preprocessing method of floating-point models.
To operate RAWDATA_S16_NHWC network on board, you need also to complete the fixation and alignment of the input data. In the following reference code, the inputs of the FillInputData function include number of floating-point network input data, MI_IPU input Tensor structure, and MI_IPU network descriptor structure.
#define ALIGN_UP(x, align) (((x) + ((align) - 1)) & ~((align) - 1))
#define CLIP3(x, min, max) ((x) < (min) ? (min) : ((x) > (max) ? (max) : (x)))

void FillInputData(MI_FLOAT* pfData, MI_IPU_TensorVector_t& InputTensorVector, MI_IPU_SubNet_InputOutputDesc_t& desc)
{
    const MI_U32 H = desc.astMI_InputTensorDescs[0].u32TensorShape[1];
    const MI_U32 W = desc.astMI_InputTensorDescs[0].u32TensorShape[2];
    const MI_U32 C = desc.astMI_InputTensorDescs[0].u32TensorShape[3];
    const MI_U32 inner_size = ALIGN_UP(C, 8); const MI_U32 outer_size = H * W;
    const MI_FLOAT Scale = desc.astMI_InputTensorDescs[0].fScalar;
    const MI_S64 ZeroPoint = desc.astMI_InputTensorDescs[0].s64ZeroPoint;
    MI_S16* pData = (MI_S16*)InputTensorVector.astArrayTensors[0].ptTensorData[0];
    for (MI_U32 i = 0; i < outer_size; i++) {
        for (MI_U32 j = 0; j < C; j++) {
            *(pData + i * inner_size + j) = (MI_S16)CLIP3(round(pfData[i * C + j] / Scale + ZeroPoint), -32768 , 32767);
        }
    }
    MI_SYS_FlushInvCache(pData, inner_size * outer_size * sizeof(MI_S16));
}
LSTM Model Conversion
Presently, LSTM model conversion only supports Caffe and Onnx frameworks.
This section will focus on the conversion of Caffe model into float.sim. For the subsequent conversion of float.sim, please refer to the foregoing description.
The conversion contains three major steps:
-
Main network conversion
-
LSTM subnet generation
-
Concatenation of main network and LSTM subnet
During the conversion process, some intermediate files will be generated and read. It is recommended to execute commands in the same directory to complete the above three steps.
Main Network Conversion
The method of main network conversion is similar to the usage of the Convert Tool described in Convert Tool. The reference command is as follows:
python3 ~/SGS_IPU_SDK/Scripts/ConvertTool/ConvertTool.py caffe \
--model_file ~/SGS_Models/caffe/caffe_lstm/caffe_lstm.prototxt \
--weight_file ~/SGS_Models/caffe/caffe_lstm/caffe_lstm.caffemodel \
--input_arrays data \
--output_arrays prob \
--output_file ./caffe_lstm_float.sim \
--input_config ~/SGS_Models/caffe/caffe_lstm/input_config.ini
After the command is executed, input_output_shape.npy and weight_biase_data.npy will be generated under the ./lstm_data directory. Only one ini file is required throughout the conversion process. For details on compilation of the ini file, see Concatenation of Main Network and LSTM Subnet.
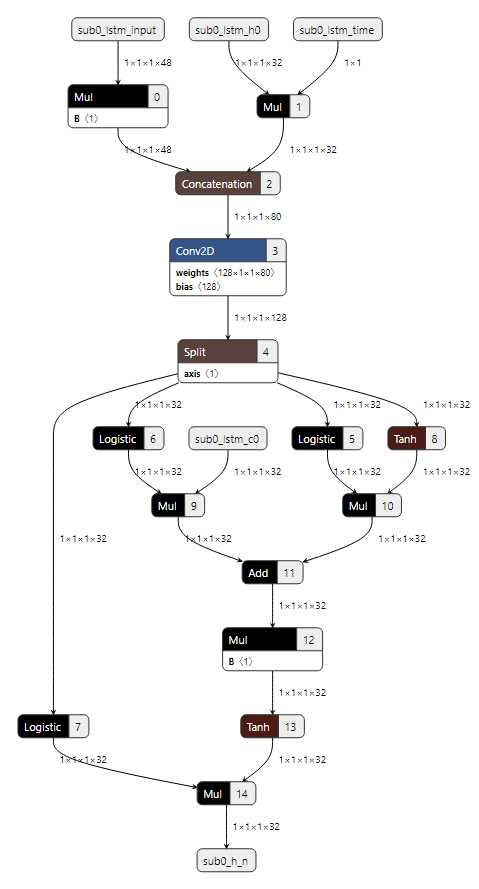
LSTM Subnet Generation
All LSTM subnets are similar in structure, except for the difference in the weight of the convolution and the shape of the operation data. So we will generate the LSTM subnet based on the intermediate file generated in the previous step. The reference command is as follows:
Caffe:
python3 ~/SGS_IPU_SDK/Scripts/postprocess/postprocess.py \
-n caffe_lstm_unroll
Onnx:
python3 ~/SGS_IPU_SDK/Scripts/postprocess/postprocess.py \
-n onnx_lstm_unroll
After the command is executed, an SGS_LSTM_sub0_unroll.sim file will be generated under the current directory.
Concatenation of Main Network and LSTM Subnet
To concatenate Main Network and LSTM Subnet, compile the ini file. At this time, the inputs and outputs in the ini file refer to the inputs and outputs of the main network respectively. The following is a reference ini file, input_config.ini, wherein the main network contains only one input and one output.
[INPUT_CONFIG]
;Names of the input arrays, comma-separated.image input must be the first.
inputs=data;
;Memory formats of input arrays, comma-separated. ;One of RGB, BGR, RGBA, BGRA, YUV_NV12, RAWDATA_S16_NHWC, RAWDATA_S16_NHWX, RAWDATA_U8_NHWC, RAWDATA_U8_NHWX
;Each entry in the list should match an entry in inputs arrays.
training_input_formats=BGR;
;Indicate the input data need qauntize or not.
;Each entry in the list should match an entry in inputs arrays.
quantizations=TRUE;
;mean_values parameter for image models,
;Each entry in the list match RGB channel of(RGB,BGR,RGBA,BGRA,YUV_NV12)
mean_red=0.0;
mean_green=0.0;
mean_blue=0.0;
;std_value parameter for image models,
std_value=1.0;
[OUTPUT_CONFIG]
;Names of the output arrays, comma-separated.
outputs=prob;
;Indicate the output data need deqauntize or not.
;Each entry in the list should match an entry in outputs arrays.
dequantizations=TRUE;
[CONV_CONFIG]
;tensor_arrays='concat_out';
To execute the concat command:
~/SGS_IPU_SDK/bin/concat_net \
--mode concat \
--input_config ~/SGS_Models/caffe/caffe_lstm/input_config.ini \
--model1 ./caffe_lstm_float.sim \
--model2 ./SGS_LSTM_sub0_unroll.sim \
--output ./lstm_float_concat.sim
After the concatenation process is done, a file named lstm_float_concat.sim will be generated. For multiple LSTM layers, you need to execute the foregoing command multiple times to do pairwise concatenation. For example, if the above model outputs two LSTM subgraphs, SGS_LSTM_sub0_unroll.sim and SGS_LSTM_sub1_unroll.sim,
then you need to execute the concat_net command twice to generate the lstm_float_concat.sim:
~/SGS_IPU_SDK/bin/concat_net \
--mode concat \
--input_config ~/SGS_Models/caffe/caffe_lstm/input_config.ini \
--model1 ./lstm_float_concat.sim \
--model2 ./SGS_LSTM_sub1_unroll.sim \
--output ./lstm_float_concat.sim
Segmented Network Conversion
In cases where one or more unsupported layers exist in the network, you can separate the entire network into multiple segments and perform segmented network conversion. In more detail, you can input the output of the preceeding network conversion, once completed, to a self-defined implementation layer, and use the output of the self-defined implementation layer as the input of the second network segment. In the following sections, we will take Faster_RCNN network as an example to illustrate how to convert segmented network.
Network Segmentation
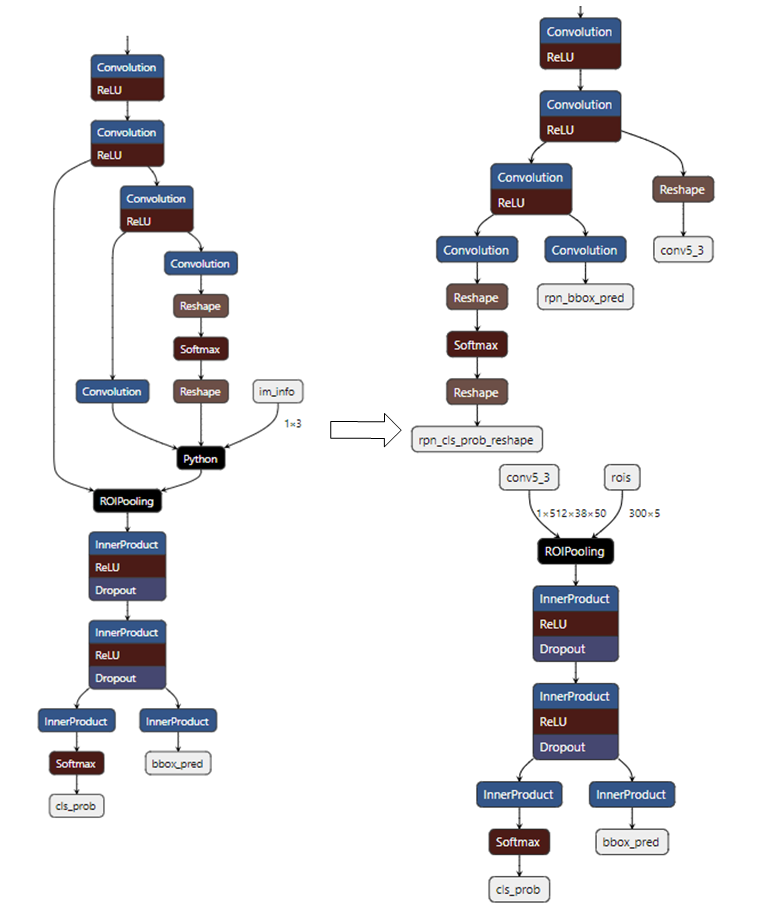
In the Faster_RCNN network, the Proposal Layer is not supported. We should therefore divide the network into two segments.
As shown in the following figure, the Python Layer is a Proposal Layer not supported by the network. So we modify prototxt file to divide the network into two segments. The first network segment contains 3 inputs, in which the outputs of rpn_cls_prob_reshape and rpn_bbox_pred will serve as the input of the Proposal Layer, and the outputs of conv5_3 and Proposal Layer will serve as the input of the second network segment.
The input of the first network segment is image data. Please prepare the input_config.ini and pre-processed Python file following input config Configuration and Image Pre-Processing Method. The input of the second network segment is not image data. Please configure the two input files with reference to RAWDATA_S16_NHWC Input Model in RAWDATA_S16_NHWC format. After completing the configuration, please use ConvertTool.py to convert the two network segments into float.sim model files. The detailed configuration file and convert command are as set forth below:
First network segment:
python3 ~/SGS_IPU_SDK/Scripts/ConvertTool/ConvertTool.py caffe \
--model_file test_stageone.prototxt \
--weight_file VGG16_faster_rcnn_final.caffemodel \
--input_arrays data \
--output_arrays rpn_cls_prob_reshape,rpn_bbox_pred,conv5_3 \
--input_config input_config.ini \
--output_file faster_rcnn_main_float.sim
[INPUT_CONFIG]
inputs=data;
input_formats=BGR;
quantizations=TRUE;
mean_red=122.7717;
mean_green=115.9465;
mean_blue=102.9801;
std_value=1;
[OUTPUT_CONFIG]
outputs=rpn_cls_prob_reshape,rpn_bbox_pred,conv5_3;
dequantizations=TRUE,TRUE,FALSE;
As illustrated above, the dequantizations of the conv5_3 output is set as FALSE. Since the output will be input to the second network segment straight ahead, there is no need to convert it to a float model when running on board. As such, the output can be fed to the second network segment directly.
Second network segment:
The input dimension of rois in ROIPooling is (Nx5). Note that only when the second half of the network is entirely InnerProduct, will you be able to set N as 300 (as illustrated above). If any convolution exists in the second half of the network, N can only be set to 1, and the second network segment should be executed N times in a loop.
python3 ~/SGS_IPU_SDK/Scripts/ConvertTool/ConvertTool.py caffe \
--model_file second_stage.prototxt \
--weight_file VGG16_faster_rcnn_final.caffemodel \
--input_arrays conv5_3,rois \
--output_arrays cls_prob,bbox_pred \
--input_config input_config_stage2.ini \
--output_file faster_rcnn_stage2_float.sim
[INPUT_CONFIG]
inputs=conv5_3,rois;
input_formats=RAWDATA_S16_NHWC,RAWDATA_S16_NHWC;
quantizations=TRUE,TRUE;
mean_red=0,0;
mean_green=0,0;
mean_blue=0,0;
std_value=1,1;
[OUTPUT_CONFIG]
outputs=cls_prob,bbox_pred;
dequantizations=TRUE,TRUE;
Network Conversion
The tool for network conversion is located at SGS_IPU_SDK/Scripts/examples/caffe_faster_rcnn/faster_rcnn_calibrator.py. This tool provides a demo conversion of the Faster_RCNN network. A direct execution will convert a 2-segment network into a fixed model.
python3 ~/SGS_IPU_SDK/Scripts/examples/caffe_faster_rcnn/faster_rcnn_calibrator.py \
-i ~/SGS_Models/resource/detection/voc_calibration_set32/ \
-m0 faster_rcnn_main_float.sim \
-m1 faster_rcnn_stage2_float.sim \
--input_config0 input_config.ini \
--input_config1 input_config_stage2.ini
To convert a segmented network, define the two segments of the network, and then configure the operation mode of the two segments in the forward parameter:
class Net(calibrator_custom.SIM_Calibrator):
    def __init__(self):
        super().__init__()
        self.main_model = calibrator_custom.calibrator(main_model_path, main_input_config)
        self.second_model = calibrator_custom.calibrator(second_model_path, second_input_config)
        self.rpn = rpn.ProposalLayer()
    def forward(self, x):
        out_details = self.main_model.get_output_details()
        input_data, im_scale = fill_inputImg2main(x)
        self.main_model.set_input(0, input_data)
        self.main_model.invoke()
        result_list = []
        for idx, _ in enumerate(out_details):
            result = self.main_model.get_output(idx)
            result_list.append(result)
        im_info = np.array([x.shape[0], x.shape[1], im_scale]).reshape(1, 3)
        bottom = [result_list[0], result_list[1], im_info]
        roi = self.rpn.forward(bottom)
        out2_details = self.second_model.get_output_details()
        self.second_model.set_input(0, result_list[2])
        self.second_model.set_input(1, roi)
        self.second_model.invoke()
        second_result = []
        for idx, _ in enumerate(out2_details):
            result = self.second_model.get_output(idx)
            second_result.append(result)
        return second_result
The Faster_RCNN network uses a self-defined rpn layer. Hence, you should take the first and second outputs of the first segment, along with the image information, as the input of the rpn layer, and take the third output of the first segment and the output roi of the rpn layer as the input of the second segment. After that, please call the Net converting process to generate a fixed model of the two network segments simultaneously.
net = Net()
net.convert(img_gen, num_process=num_subsets, fix_model=[out_main_model, out_second_model])
Network Operation
The tool for network operation is located at SGS_IPU_SDK/Scripts/examples/caffe_faster_rcnn/faster_rcnn_simulator.py. This tool provides a demo operation of the Faster_RCNN network in two segments directly.
python3 ~/SGS_IPU_SDK/Scripts/examples/caffe_faster_rcnn/faster_rcnn_simulator.py \
-i ~/SGS_Models/resource/detection/004545.jpg \
-m0 faster_rcnn_main_float.sim \
-m1 faster_rcnn_stage2_float.sim \
-t Float
Operating a 2-segment network model is similar to converting a 2-segment network model. For network operation, you should watch out for the garbage data which can be generated with the Fixed and Offline model output, and keep the data aligned before feeding them to the second model. See RAWDATA_S16_NHWC Input Model for details. Since the conv5_3 output of the first segment will be input to the second network segment straight ahead, there is no need to remove the garbage data nor convert the output to a float model when operating the network. The output can be fed to and used as the input of the second network segment directly.
class Net(calibrator_custom.SIM_Simulator):
    def __init__(self):
        super().__init__()
        self.main_model = main_model
        self.second_model = second_model
        self.rpn = rpn.ProposalLayer()
    def forward(self, x):
        # Run main model
        out_details = self.main_model.get_output_details()
        input_data, im_scale = fill_inputImg2main(x, norm=norm)
        self.main_model.set_input(0, input_data)
        self.main_model.invoke()
        result_list = []
        for idx, _ in enumerate(out_details):
            result = self.main_model.get_output(idx)
            # Get main output for Fixed and Offline model
            if result.shape[-1] != out_details[idx]['shape'][-1] and out_details[idx]['name'] != 'conv5_3':
                result = result[..., :out_details[idx]['shape'][-1]]
            if out_details[idx]['dtype'] == np.int16 and out_details[idx]['name'] != 'conv5_3':
                scale, _ = out_details[idx]['quantization']
                result = np.dot(result, scale)
            result_list.append(result)
            # Run Proposal Layer
        im_info = np.array([x.shape[0], x.shape[1], im_scale]).reshape(1, 3)
        bottom = [result_list[0], result_list[1], im_info]
        roi = self.rpn.forward(bottom)
        # Run Second stage model
        in2_details = self.second_model.get_input_details()
        out2_details = self.second_model.get_output_details()
        in2_data = [result_list[2], copy.deepcopy(roi)]
            for idx, in2_info in enumerate(in2_details):
                if in2_info['dtype'] == np.int16 and in2_info['name'] != 'conv5_3':
                    # Set second model input for Fixed and Offline model
                    ins, zp = in2_info['quantization']
                    in2_data[idx] = (in2_data[idx] * 0.0625 / ins + zp).astype(in2_info['dtype'])
                    feature_s16 = np.zeros(in2_info['shape']).astype('int16')
                    feature_s16[..., :in2_data[idx].shape[-1]] = in2_data[idx]
                    self.second_model.set_input(in2_info['index'], feature_s16)
                else:
                    self.second_model.set_input(in2_info['index'], in2_data[idx])
            self.second_model.invoke()
            second_result = []
            for idx, _ in enumerate(out2_details):
                result = self.second_model.get_output(idx)
                # Get second output for Fixed and Offline model
                if result.shape[-1] != out2_details[idx]['shape'][-1]:
                    result = result[..., :out2_details[idx]['shape'][-1]]
                if out2_details[idx]['dtype'] == np.int16:
                    scale, _ = out2_details[idx]['quantization']
                    result = np.dot(result, scale)
                second_result.append(result.reshape(300, -1))
            second_result.append(roi)
            second_result.append(im_info)
            return second_result
To operate the network, create an instance of Net, and then call your self-defined process to start the operation. See calibrator_custom.SIM_Simulator for details.
net = Net()
results = net(img_gen, num_process=num_subsets)
Multi-Input Network Conversion
Building a Multi-Input Network
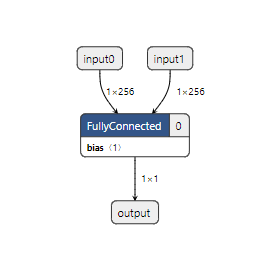
To build a two-input network, use TensorFlow1.14.0 to perform matrix multiplication and calculate inner product of two vectors:
import tensorflow as tf
import numpy as np

SHAPE_DIMS = 256

input_np0 = np.random.rand(1, SHAPE_DIMS).astype(np.float32)
input_np1 = np.random.rand(1, SHAPE_DIMS).astype(np.float32)

input_0 = tf.placeholder(dtype=tf.float32, shape=(1, SHAPE_DIMS), name='input0')
input_1 = tf.placeholder(dtype=tf.float32, shape=(1, SHAPE_DIMS), name='input1')
out = tf.matmul(input_0, tf.reshape(input_1, (SHAPE_DIMS, 1)), name='output')

with tf.Session() as sess:
    results = sess.run(out, feed_dict={input_0: input_np0, input_1: input_np1})

    # Convert .pb
    output_graph_def = tf.graph_util.convert_variables_to_constants(
        sess,
        sess.graph_def,
        ['output']
    )
    with tf.gfile.GFile('matmul.pb', 'wb') as f:
        f.write(output_graph_def.SerializeToString())
    print('matmul.pb Saved!')

# convert to .tflite
tflite_model = tf.lite.TFLiteConverter.from_frozen_graph(
    'matmul.pb',
    ['input0', 'input1'],
    ['output']
)
tflite_model = tflite_model.convert()
with open('matmul.tflite', 'wb') as f:
    f.write(tflite_model)
print('matmul.tflite Saved!')
A matmul.tflite model file will be generated after running the above script.
Converting a Multi-Input Network
In the following we will describe how to convert matmul.tflte into a model file which can be operated on the board. Note that matmul.tflite model is not an image input. For details on the configuration of the input_config.ini file, please refer to RAWDATA_S16_NHWC Input Model.
First, configure the input_config.ini script:
[INPUT_CONFIG]
inputs=input0,input1;
input_formats=RAWDATA_S16_NHWC,RAWDATA_S16_NHWC;
quantization=TRUE,TRUE;
mead_red=0,0;
mean_green=0,0;
mean_blue=0,0;
std_value=1,1;

[OUTPUT_CONFIG]
outputs=output;
dequantization=TRUE;
Run the following script under the SGS_IPU_SDK directory to output the Library path (can be ignored, if this has already been done):
cd ~/SGS_IPU_SDK
source cfg_env.sh
Then use the ConvertTool to convert matmul.tflite:
python3 ~/SGS_IPU_SDK/Scripts/ConvertTool/ConvertTool.py tflite \
--model_file /path/to/matmul.tflite \
--input_config /path/to/input_config.ini \
--output_file /path/to/matmul_float.sim
For multi-input network, calibrator_custom module will be used in the calibration process. See calibrator_custom.calibrator for details. However, unlike the case set out in calibrator_custom.SIM_Calibrator, the input generator must be configured as two-input. The following example illustrates how to save the file as matmul_calibrator.py:
# -*- coding: utf-8 -*-

import calibrator_custom
import os
import sys
import numpy as np
import argparse
from calibrator_custom import utils

class Net(calibrator_custom.SIM_Calibrator):
    def __init__(self, model_path, input_config):
        super().__init__()
        self.model = calibrator_custom.calibrator(model_path, input_config)

    def forward(self, x, y):
        out_details = self.model.get_output_details()
        self.model.set_input(0, x)
        self.model.set_input(1, y)
        self.model.invoke()
        result_list = []
        for idx in range(len(out_details)):
            result = self.model.get_output(idx)
            result_list.append(result)
        return result_list

def arg_parse():
    parser = argparse.ArgumentParser(description='Calibrator Tool')
    parser.add_argument('-m', '--model', type=str, required=True,
                        help='Model path.')
    parser.add_argument('--input_config', type=str, required=True,
                        help='Input config path.')
    parser.add_argument('--quant_level', type=str, default='L5',
                        choices=['L1', 'L2', 'L3', 'L4', 'L5'],
                        help='Indicate Quantilization level. The higher the level,\
                        the slower the speed and the higher the accuracy.')
    parser.add_argument('--num_process', default=10, type=int,
                        help='Amount of processes run at same time.')
    parser.add_argument('-o', '--output', default=None, type=str,
                        help='Output path for fixed model.')

    return parser.parse_args()

def data_gen():
    calibrator_data = np.random.rand(100, 1, 256).astype(np.float32)
    bench_data = np.random.rand(100, 1, 256).astype(np.float32)
    for i, j in zip(calibrator_data, bench_data):
        yield [i, j]

def main():
    args = arg_parse()
    model_path = args.model
    input_config = args.input_config
    quant_level = args.quant_level
    num_subsets = args.num_process
    output = args.output

    if not os.path.exists(model_path):
        raise FileNotFoundError('No such {} model'.format(model_path))

    if not os.path.exists(input_config):
        raise FileNotFoundError('input_config.ini file not found.')

    net = Net(model_path, input_config)
    print(net)

    # random generate data
    # must change real data when using
    img_gen = data_gen()
    print('\033[31m[WARNING] random generate data,\
          must change real data when using!\033[0m',
          file=sys.stderr)

    out_model = utils.get_out_model_name(model_path, output)
    net.convert(img_gen, num_process=num_subsets,
                quant_level=quant_level, fix_model=[out_model])

if __name__ == '__main__':
    main()
To convert matmul_float.sim by the compiled matmul_calibrator.py and generate the matmul_fixed.sim:
python3 matmul_calibrator.py \
-m /path/to/matmul_float.sim \
--input_config /path/to/input_config.ini
Note that the input data to quantify the model must be replaced with real data; otherwise, the accuracy of the fixed model generated by statistics will be wrong. If it is difficult to quantify the model individually, for example, when the model is one running behind a certain network, you can refer to Segmented Network Conversion and, according to the multi-segment network processing, define multiple models in the calibrator_custom.SIM_Calibrator to generate multiple fixed networks directly. After that, please use compiler.py to convert matmul_fixed.sim and generate matmul_fixed.sim_sgsimg.img.
Running Multi-Input Network on PC
It is to be noted that, when running a Float network, the input data type should be float32 and the input data shape should be identical with the input shape of the model. Since, however, the fixed and offine models of the matmul both use RAWDATA_S16_NHWC input, the input data should be dequantized to int16 and aligned before being input to the model. Therefore, you should pay attention to this model particularity when defining the forward function in calibrator_custom.SIM_Simulator:
class Net(calibrator_custom.SIM_Simulator):
    def __init__(self, model_path, phase):
        super().__init__()
        if phase == 'Float':
            self.model = calibrator_custom.float_simulator(model_path)
        elif phase == 'Fixed':
            self.model = calibrator_custom.fixed_simulator(model_path)
        else:
            self.model = calibrator_custom.offline_simulator(model_path)

    def forward(self, x, y):
        in_details = self.model.get_input_details()
        out_details = self.model.get_output_details()
        in2_data = [x, y]
        for idx, in_info in enumerate(in_details):
            if in_info['dtype'] == np.int16:
                # Set model input for Fixed and Offline model
                ins, zp = in_info['quantization']
                in2_data[idx] = np.clip((in2_data[idx] / ins + zp), -32768, 32767).astype(in_info['dtype'])
                feature_s16 = np.zeros(in_info['shape']).astype('int16')
                feature_s16[..., :in2_data[idx].shape[-1]] = in2_data[idx]
                self.model.set_input(in_info['index'], feature_s16)
            else:
                self.model.set_input(in_info['index'], in2_data[idx])
        self.model.invoke()
        result_list = []
        for idx in range(len(out_details)):
            result = self.model.get_output(idx)
            # for Fixed and Offline model
            if result.shape[-1] != out_details[idx]['shape'][-1]:
                result = result[..., :out_details[idx]['shape'][-1]]
            if out_details[idx]['dtype'] == np.int16:
                scale, _ = out_details[idx]['quantization']
                result = np.dot(result, scale)
            result_list.append(result)
        return result_list
Running Multi-Input Network on Board
The matmul_fixed.sim_sgsimg.img network input utilizes RAWDATA_S16_NHWC; please refer to the FillInputData function set forth in Model Operation for the operation details. Similar to the PC case, you need to preprocess the input data before passing them to the model. For multi-input models, you need only input data to the seond input in the FillInputData function of the model:
// input0
MI_S16* pData0 = (MI_S16*)InputTensorVector.astArrayTensors[0].ptTensorData[0];
// input1
MI_S16* pData1 = (MI_S16*)InputTensorVector.astArrayTensors[1].ptTensorData[0];
If matmul_fixed.sim_sgsimg.img is intended to utilize the output data of the previous model, you can configure the input_config.ini of the previous model as follows: In [OUTPUT_CONFIG], set dequantization = FALSE. Once configured this way, the output data type of the previous model will be INT16, that is, the output data can be directly used as the input of the matmul_fixed.sim_sgsimg.img model.